
How to Incubate Chicken Eggs on the Homestead: A Practical Guide for Self-Sufficiency
Raising chickens is a cornerstone of the homesteading lifestyle. Whether you’re after eggs, meat, or a more self-sustaining setup, incubating your own chicken eggs is a skill every homesteader should consider adding to their toolkit. It’s cost-effective, empowering, and gives you full control over your flock from day one.
In this guide, we’ll walk through everything you need to know to hatch your own chicks right on the homestead.
Why Incubate Your Own Eggs?
For homesteaders, incubation means independence. No relying on hatcheries or feed stores—just your own flock, your own eggs, and your own skills. It also lets you:
-
Control the genetics of your flock
-
Time hatches for specific seasons
-
Build resilience by reducing outside dependencies
Step 1: Select the Right Eggs
If you already have a rooster in your flock, you’re set. Collect fertilized eggs daily, and follow these tips:
-
Use eggs under 7 days old for the best hatch rates.
-
Keep them at room temperature (not refrigerated).
-
Don’t wash them—the natural bloom protects against bacteria.
-
Avoid odd-shaped, cracked, or very dirty eggs, which may not hatch or can introduce disease.
If you’re sourcing eggs from another farm, try to pick them up directly instead of having them shipped, as rough handling and temperature swings can reduce viability.
Step 2: Choose an Incubator that Fits Your Needs
Homesteaders often balance practicality with budget. You don’t need to break the bank to get a reliable incubator. (I use the Nature Right 360)
Look for these essentials:
-
Temperature control (digital thermostat is ideal)
-
Humidity control or at least good airflow
-
Manual or automatic egg turning (manual is fine if you’re home regularly)
Pro tip: Some homesteaders build their own incubators using coolers, thermostats, and heat bulbs. It’s a great DIY project if you’re comfortable with basic wiring and temperature regulation.
Step 3: Set Up for Success
Before adding eggs:
-
Run the incubator for 24 hours to ensure the temperature holds at 99.5°F (37.5°C).
-
Humidity should be 40–50% for the first 18 days. Do this by adding water as needed to the water tray.
-
Place eggs pointed end down or on their sides if you’re turning manually.
Step 4: Incubation Timeline
Here’s what to expect over the 21-day hatch period:
-
Days 1–18: Turn eggs 3–5 times per day (skip this if you have an automatic turner). Keep temperature and humidity stable. Candle the eggs on Day 7 and Day 14 to check for development.
-
Day 18 (Lockdown): Stop turning the eggs. Bump humidity to 65–70% and resist opening the incubator unless absolutely necessary.
-
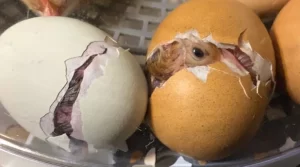
Day 21: Hatching day! You’ll hear chirping, see pipping (small cracks), and eventually watch your chicks break free. Don’t rush to help—they often take 12–24 hours from first pip to full hatch.
Step 5: Brooding the New Flock
After hatching, move chicks to a warm brooder once they’re dry and fluffy.
Brooder basics:
-
Heat lamp or brooder plate (start at 95°F and lower 5°F per week)
-
Chick starter feed
-
Shallow waterer with marbles or pebbles to prevent drowning
-
Clean bedding (pine shavings or straw work well)
Troubleshooting Common Issues
-
Poor hatch rate? Recheck your temperature calibration and make sure you turned eggs consistently.
-
Chicks not pipping? Humidity may have been too low or eggs were infertile—check your rooster’s fertility and egg storage practices.
-
Early deaths inside the shell? Can point to temperature spikes or bacterial contamination.
Final Thoughts: Incubation as a Homesteading Skill
Learning to incubate your own eggs isn’t just about raising chickens—it’s about increasing your self-reliance. Once you master it, you won’t just have chickens… you’ll have the ability to regenerate your flock year after year, on your own terms.
It takes a bit of patience, observation, and consistency—but the reward of holding a chick you brought into the world is well worth the effort.
Happy hatching, and here’s to your growing homestead!